
Learning to Create Mind Map ,Visual Understanding Environment, Mind Map
Learning to Create Mind Map |
Visual Understanding Environment
What is Mind Map?
A mind map is a diagram used to visually organize information. A mind map is hierarchical and shows relationships among pieces of the whole.It is often created around a single concept, drawn as an image in the center of a blank page, to which associated representations of ideas such as images, words and parts of words are added. Major ideas are connected directly to the central concept, and other ideas branch out from those major ideas.Mind maps can also be drawn by hand, either as "rough notes" during a lecture, meeting or planning session.
Example 1: Mind Map of Pollution

EXAMPLE 2: SPORTS

A mind map is a tool for the brain that captures the thinking that goes on inside your head. Mind mapping helps you think, collect knowledge, remember and create ideas. Most likely it will make you a better thinker.Mind maps can be created in many different ways, but they share the same basics:
What is VUE?
The Visual Understanding Environment (VUE) is an Open Source Software. The VUE project is focused on creating flexible tools for managing and integrating digital resources in support of teaching, learning and research. VUE provides a flexible visual environment for structuring, presenting, and sharing digital information
At its core, the Visual Understanding Environment (VUE) is a concept and content mapping application, developed to support teaching, learning and research and for anyone who needs to organize, contextualize, and access digital information. Using a simple set of tools and a basic visual grammar consisting of nodes and links, faculty and students can map relationships between concepts, ideas and digital content.
At its core, the Visual Understanding Environment (VUE) is a concept and content mapping application, developed to support teaching, learning and research and for anyone who needs to organize, contextualize, and access digital information. Using a simple set of tools and a basic visual grammar consisting of nodes and links, faculty and students can map relationships between concepts, ideas and digital content.
GETTING STARTED VUE
CREATING A NEW MAPTo open VUE:
1. Select Start > All Programs > VUE.
VUE opens and the VUE toolbars, map canvas, and floating Formatting Palette are visible.
VUE Screen

The Formatting Palette allows you to change the style and formatting properties of objects on the map canvas. The Formatting Palette is not docked by default as it may be dragged or placed wherever is convenient, either inside or outside the map canvas. Based on your screen size, you can leave it open or close it after use.
The Formatting Palette allows you to change the style and formatting properties of objects on the map canvas. The Formatting Palette is not docked by default as it may be dragged or placed wherever is convenient, either inside or outside the map canvas. Based on your screen size, you can leave it open or close it after use.
CREATING NODES IN VUE
The first step in building the map is to create a node. A node is a shape that represents a concept or idea.
1. From the toolbar, click the Node Tool. The cursor takes the crosshair (+) shape.

- Move the cursor onto the map panel where you would like the node to appear. The crosshair ( + ) is visible.
- Click and drag on the map canvas. A new node is created.
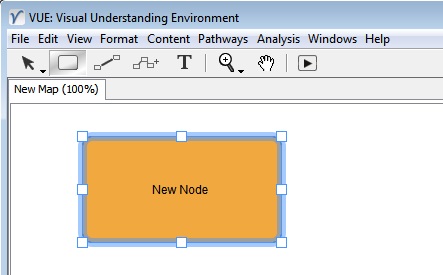
3.Once the node is drawn it can be labeled.
4.Ensure the cursor is flashing within the node and then type a name for the node.
5.Click outside the node. The node is named.
The label can be as long as you want. While the Node Tool is selected, you may continue to create multiple nodes.
1.Select the node. Sizing handles appear around the node.
2.On the Formatting Palette, adjust the properties.
Selection Tip
Instead of adjusting the style of multiple nodes one by one, you have the ability in VUE to adjust the properties of multiple nodes at the same time.
On the map canvas:
a.Click and drag to draw a rectangle surrounding the nodes. Sizing handles appear around the selection.
b.On the Formatting Palette, adjust the properties as outlined above.
FORMATTING PALETTE IN VUE
The nodes have default attributes that include shape, fill, outline, and text color. When selected, you can change the style of your nodes by modifying the node properties that appear on the Formatting Palette.
To access the Formatting Palette:
1.From the menu bar, select either Format or Windows. The menu opens.
2.Select Formatting Palette. The Formatting Palette opens.
The Formatting Palette may be dragged or placed wherever is convenient, either inside or outside the map canvas. Based on your screen size, you can leave it open or close it after use.

 |
Defines
node shape. There are 9 choices.
|
 |
Defines
the background color of the node.
|
 |
Defines
the outside border color of the node.
|
 |
Defines
the outside border style of the node. There are 5 choices.
|
 |
Defines
the outside border weight or width of the node, from 0 pixels to 6 pixels. 0
pixels is invisible.
|
 |
Defines
the font face or type of node text.
|
 |
Defines
the font size of node text.
|
 |
Defines
the font color of node text.
|
 |
Bolds node
text. Can be toggled on and off.
|
 |
Italicizes node text. Can be toggled on and off.
|
 |
Underlines text. Can be toggled on and off.
|
 |
Creates ordered list.
|
 |
Creates unordered list.
|
 |
Defines the alignment of text.
|
Note: You cannot apply underlining, bullets, or alignment to text in node labels.
CREATING LINKS BETWEEN NODES IN VUE
Once nodes have been created, the next step will be to create relationships between the nodes by linking them. Where nodes represent concepts or ideas, links represent relationships between the concepts. The process of linking the nodes adds organization to the map.To create a link:
1.From the toolbar, click the Link Tool. The cursor takes the crosshair (+) shape.

2. Click a node and drag the cursor to another node. A link is created between the two nodes.

3.Type a label for the link.
4.Click outside the link. The link is labeled.
While the Link Tool is selected, you may continue to create link after link.
Here is a keyboard shortcut to create a link:
1.Click the Selection tool . The cursor changes to a white arrow.
2.Click on one node and hold down Alt (Windows) or Option (Mac) and drag from one node to another. The link is created.
The same shortcut will create a new link and node if the mouse is released on blank canvas.
Rapid prototyping
On the toolbar, when you clicked the Link Tool to create a link, you may have noticed the Rapid prototyping tool just to the right.
Previously, you created a link between two existing nodes. This linking tool creates a link from an existing node to a new node.
To create a new node with a link already attached to it from an existing node:
1.Click the Rapid prototyping tool.
2.Click an existing node.
3.Drag out into the window. The link is created and extended.
4.Release the mouse. A linked node is created.
5.Type a name for the node.

6.Click the link.
7.Type a label for the link.
8.Save your work.


Nice
ReplyDeleteExcellent Blog. I can configure my new idea from this post. Detailed information is given. Thank you all for this valuable information Digital Signature
ReplyDeleteThanks for the nice video. It was very useful for me. We are one of the best Digital Signature Agency in Delhi
ReplyDeleteThis article is very nice. I got information to improve my blog traffic. Thank you very much
ReplyDeleteDigital Signature Certificate